
RaceBox User Manual
Warning Before operating the device, please read the safety instructions
General
To power on the device press the right arrow (bottom right button)
To power off the device go to the main menu and hold the left arrow (top right button) for a few seconds
To navigate the menus use the up and down arrows (the buttons on the left). Enter a menu with the right arrow (bottom right button), exit a menu with the left arrow (top right button).
Before first use
RaceBox comes ready to mount and drive. However it is recommended to review the Settings menu and adjust time zone, auto shutdown and other general device configurations.
Mount RaceBox on the windshield of your car using the provided suction cup. Place it as close to the front as possible for best results. Make sure the device has a clear and unobstructed view of the sky. If necessary, use a compatible external GPS antenna, route it to the outside of the vehicle and secure it on the rooftop. Make sure the cable is not pinched by doors or other panels and does not take sharp corners. Adjust the angle of the RaceBox so you have clear view from the driving seat. Tighten the screws of the suction cup by hand - do not use tools and do not over-tighten to avoid damage.
Charging
RaceBox comes with built-in Lithium battery. To charge it connect the provided (or compatible) USB Type C cable at the back of the device and plug it into suitable charger (2A capable). To check charge status turn RaceBox on and wait for a few seconds. When the battery is fully charged the indicator in the top left corner will light in green.
RaceBox comes with a charging cable with magnetic quick-detach piece plugged in the charging port. Unplug it to access the UST Type-C connector to use with other compatible cables.
Using External GPS Antenna
If your vehicle is equipped with a heated front window, or you cannot mount RaceBox so it has good GPS reception, you can use a compatible external GPS antenna. Connect it to the back of the device by screwing it by hand to the SMA connector. Do not use tools - secure it but be sure not to over-tighten to avoid permanent damage. Go to the GPS Settings and configure RaceBox to use the external antenna.
Main Menu
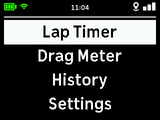
- Lap Timer - measure lap/sector times on a track.
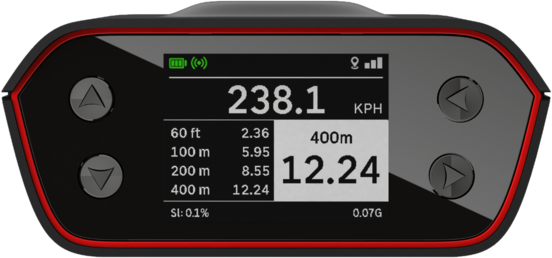
Go to Lap Timer User Manual - Drag Meter - measure straight-line disciplines, like quarter mile, 400 meters, 100-200kph and others.
Go to Drag Meter User Manual - History - view information about previously recorded laps sessions and drag runs
Go to History User Manual - Settings - configure RaceBox
Go to Settings User Manual
From the main menu press and hold the left arrow (top right button) to power off the device.
The top center of the screen displays a wall time clock. If it appears inaccurate make sure you have configured your time zone in Time Zone Settings. Clock is automatically adjusted via GPS
Status indicators
At the top of the screen RaceBox displays several important status icons.
- In the right corner is GPS status information. "NO FIX" means your current location is unknown, three empty bars means you have poor fix, one full bar means GPS accuracy is below 1.5 meters, two full bars - below 1 meter, three full bars - below 0.5 meters (20 inch). To have maximum accuracy wait for at least two full bars before driving.
- In the left corner is the battery level and WiFi status (green for enabled, gray for disabled).
- If storage is nearly full a red storage warning icon will be displayed next to the WiFi indicator.